Pin It Now!
Ever have one of those days when you wake up & realize you forgot to make/send a card that you knew at least a week ago you had to do??? Well today was that way for me: if I want my aunt & uncle to get their anniversary card ON TIME (a rarity for me lately it seems) then it has to get mailed today...but first I have to MAKE it! Anyway, recently I saw a card on our demos-only website & fell in love with it; the color combo & the simple layout. The card I made is a CASE of the card I saw by Kay Kalthoff. Here's mine:
The colors are Pool Party & Chocolate Chip. I used the new stamp set "My Friend" & the all occasion must-have set "Teeny Tiny Wishes". I also used the Lace Ribbon Border punch. This card took less than 20 minutes to put together & was super easy. I may make up a few more in different colors & stamp a couple different sentiments on them...or leave it blank. Wouldn't this look beautiful in black & white?
Well now I've got to run & drop this off in the mail box ;) I hope you've all had a terrific week & have a relaxing weekend :) Hope you have some time for some stamping, too! ;)
Sarah Goke ~ Independent Stampin’ Up! Demonstrator
Welcome to a nice, quiet place to stamp & relax
Friday, August 19, 2011
Thursday, August 18, 2011
PPA107 - A break from other projects
Pin It Now!
For the past several days I've been working on a project for a large Stamp Camp a fellow demo is having in early October. I'm in charge of the stocking card I shared a few days ago & have to have 80+ of them prepped & ready to go by the end of September. I actually had to turn Christmas music on yesterday to help me kick it into gear so I could completely finish 20 for the meeting last night ;) It was then that we found out how many we have to have ready for the next meeting. Well, before I dive head first into them I needed a break so I decided to do the challenge over at Pals Paper Arts. And here is my finished card:

I just received the Blossom Bouquet triple layer punch & HAD to use it! WOW! I don't know why it took me so long to order it but I'm so glad I did; it's quickly become my favorite ;) I punched out 4 blossoms from Blushing Bride card stock & 4 from Very Vanilla. I used some multipurpose glue & glued the pink outside rings to 1 3/4" Basic Gray squares. I then used the same glue & glued the vanilla middles & finally glued the pink centers. I created the centers using the small circle punch from the Itty Bitty Shapes punch pack & Blushing Bride card stock. Once all the squares were finished I ran them through the Big Shot with the tiny dotted background texturz plates. On the Very Vanilla card base I glued a piece of 3 1/4" x 4 1/4" Blushing Bride designer series paper pack. All the squares are popped up using dimensionals. I left the sentiment off the front since I don't know what I'm going to use it for yet ;) When it comes time for me to use it I'll stamp the sentiment on the inside. Maybe a birthday card? Thinking of You? Congratulations? Hmmm....the possibilities are endless! :)
Hope you're enjoying your week so far & happy stampin'!
I just received the Blossom Bouquet triple layer punch & HAD to use it! WOW! I don't know why it took me so long to order it but I'm so glad I did; it's quickly become my favorite ;) I punched out 4 blossoms from Blushing Bride card stock & 4 from Very Vanilla. I used some multipurpose glue & glued the pink outside rings to 1 3/4" Basic Gray squares. I then used the same glue & glued the vanilla middles & finally glued the pink centers. I created the centers using the small circle punch from the Itty Bitty Shapes punch pack & Blushing Bride card stock. Once all the squares were finished I ran them through the Big Shot with the tiny dotted background texturz plates. On the Very Vanilla card base I glued a piece of 3 1/4" x 4 1/4" Blushing Bride designer series paper pack. All the squares are popped up using dimensionals. I left the sentiment off the front since I don't know what I'm going to use it for yet ;) When it comes time for me to use it I'll stamp the sentiment on the inside. Maybe a birthday card? Thinking of You? Congratulations? Hmmm....the possibilities are endless! :)
Hope you're enjoying your week so far & happy stampin'!
Tuesday, August 16, 2011
Mojo 204
Pin It Now!
I attempted another Mojo Monday challenge & here's the result:
When I first saw the sketch I immediately knew I wanted to ink up one of the cutest witches I've seen so I got out the "Greeting Card Kids" set. I started with Concord Crush for the base & adhered a 2 1/4" x 3 3/4" piece of Pear Pizzazz designer series paper. I then used the Circle Scissor Plus to cut out 2 different sized circles (the smallest is 2 3/4" I believe), one from Whisper White card stock & the other from Pumpkin Pie card stock. I then stamped the image using StazOn & colored her using Stampin' Write markers. I used Snail to adhere the circles together & to put them onto the 3" black square. I added the 1/4" grosgrain ribbon (Pumpkin Pie) behind the square & popped the entire layer up on dimensionals. I then used some Vanilla Shimmer Smooch Spritz on the entire card before adding the rhinestones in the corner. I first saw Mary Fish color the rhinestones using a Sharpie & had an "Ah ha!" moment: I've had a box of a lot of different colored Sharpies sitting around that I just haven't been able to get rid of; I got it out today & found a green I thought looks very close to Pear Pizzazz :)
This sketch went together so quickly; I will definitely be using this one again in the future :) I even managed to use 3 different items that I haven't played with in forever: "Greeting Card Kids" stamp set; Circle Scissor Plus; & Smooch Spritz. And I also finally had a reason to get out those Sharpies I've been saving for literally years (I think I bought them for my 16 year old for a school project back in Middle School...) :)
So what can you find to use today that you've been "neglecting" for awhile? Have fun & get creative!!! :)
When I first saw the sketch I immediately knew I wanted to ink up one of the cutest witches I've seen so I got out the "Greeting Card Kids" set. I started with Concord Crush for the base & adhered a 2 1/4" x 3 3/4" piece of Pear Pizzazz designer series paper. I then used the Circle Scissor Plus to cut out 2 different sized circles (the smallest is 2 3/4" I believe), one from Whisper White card stock & the other from Pumpkin Pie card stock. I then stamped the image using StazOn & colored her using Stampin' Write markers. I used Snail to adhere the circles together & to put them onto the 3" black square. I added the 1/4" grosgrain ribbon (Pumpkin Pie) behind the square & popped the entire layer up on dimensionals. I then used some Vanilla Shimmer Smooch Spritz on the entire card before adding the rhinestones in the corner. I first saw Mary Fish color the rhinestones using a Sharpie & had an "Ah ha!" moment: I've had a box of a lot of different colored Sharpies sitting around that I just haven't been able to get rid of; I got it out today & found a green I thought looks very close to Pear Pizzazz :)
This sketch went together so quickly; I will definitely be using this one again in the future :) I even managed to use 3 different items that I haven't played with in forever: "Greeting Card Kids" stamp set; Circle Scissor Plus; & Smooch Spritz. And I also finally had a reason to get out those Sharpies I've been saving for literally years (I think I bought them for my 16 year old for a school project back in Middle School...) :)
So what can you find to use today that you've been "neglecting" for awhile? Have fun & get creative!!! :)
Monday, August 15, 2011
Holiday Mini Sneak Peek!
Pin It Now!
Now that the kiddos are back in school I feel like the holidays are right around the corner. I suppose the fact that I have all my pre-order goodies from the new Holiday Mini already kind of helped me get in the mood too :) I want everything in this new mini! There are TONS of amazing stamps, designer series paper, embellishments, etc. that you're just going to love. For my first Holiday Mini Sneak Peek I'm going to share with you the card we'll be doing at a HUGE stamping event a demo friend of mine is hosting in October. It's a CASE (copy & share everything) of the card shown in the mini. Are you ready?
How fantastic is this!? This new stamp set called "Stitched Stockings" coordinates with a new builder punch (Stocking Builder Punch). Two of the stockings were stamped using Lucky Limeade & the other was stamped using Cherry Cobbler. I punched each of these out with the new punch. I then inked up the cuff, heel, & toe stamp & stamped it in Cherry Cobbler twice & the third time I inked it with Lucky Limeade. I used the new punch again to punch out these pieces & then used Snail to adhere them to the stockings. I stamped the sentiment from another new stamp set, "Hand-Penned Holidays", at the bottom of the Whisper White card stock using Early Espresso ink. At the top of the Whisper White layer I stamped the "loop" image using Early Espresso ink. I "hung" each stocking on the loop using dimensionals. I used Snail to adhere the white layer to the Lucky Limeade card base. Can you see I used a few new embellishments? Aren't those tiny jingle bells cute!? And they work! :) I threaded some Cherry Cobbler baker's twine through each bell & tied a bow before adhering each one to a stocking with a mini glue dot. For a finishing touch I did faux stitching around the panel using the small tip on my Cherry Cobbler marker.
I am having too much fun playing around with all the new goodies! I have more coming so be sure to check back in :) Hope you have an amazing week!
Tuesday, August 9, 2011
"From Our Hearts" needs your help
Pin It Now!
Today I'd like to draw your attention to the badge on the right of my blog that I added over a week ago: From Our Hearts. For those of you who may not have ever heard of them they are a not-for-profit organization that receives donated hand-crafted cards from stampers all over the country & ships them to soldiers overseas so they can use them for loved ones back home. They need as many cards & or card fronts as possible to keep this going. If you would please check out their website (just click on the badge) & see how easy it is to help out. Please don't feel as though you can't help unless you have tons of cards or card fronts to send first; any thing you can send will be greatly appreciated.
I've been going through all the cards I've accumulated over the past year & will have a box ready to send later this week. This is a great way to support the thousands of men & women putting their lives on the line for us; a small yet meaningful way to say "Thank You".
Plus think of all the stamping you'll "have" to do to re-stock your own card supply??? ;) This way EVERYONE is happy! :)
I've been going through all the cards I've accumulated over the past year & will have a box ready to send later this week. This is a great way to support the thousands of men & women putting their lives on the line for us; a small yet meaningful way to say "Thank You".
Plus think of all the stamping you'll "have" to do to re-stock your own card supply??? ;) This way EVERYONE is happy! :)
Monday, August 8, 2011
Pin It Now!
One full week of school is behind us already & I think we've all settled into our new routine by now. Our 4 year old keeps thinking he's going to be late since he doesn't leave for school until 11:15 but hopefully one of these days he'll stop asking "What about my school Mom!? I don't want to miss it!"
Today I'd like to show you the little gift I made for the Pre-K teacher for the first day of school. It was soooo easy peasy that I wish I had more to make! However our big-shot sophomore & 6th grader did NOT want to give out first-day-of-school gifts so I had to be ok with making just one ;)
Isn't this adorable!? It's made using a 10" x 3 1/2" piece of card stock scored at 2", 2 1/2", 6", & 6 1/2". I also used some Poppy Parade DSP to decorate the front 2 panels. The stamp set is the only scholastic set I have but it's retired :( I stamped the row of apples twice & colored them in using my Poppy Parade Stampin' Write marker. This holds a pad of post-it notes perfectly on the inside. I used Sticky Strip on the back of the note pad to make sure it stayed in place. You could add some velcro to keep the flap closed but I didn't have any on hand. Our youngest felt so proud carrying this to school & giving it to his teacher; he was definitely a big kid! ;)
I hope you enjoyed my little project today :) I may just make one for myself to keep on my workspace & decorate it without school stuff ;)
Happy Monday!
Today I'd like to show you the little gift I made for the Pre-K teacher for the first day of school. It was soooo easy peasy that I wish I had more to make! However our big-shot sophomore & 6th grader did NOT want to give out first-day-of-school gifts so I had to be ok with making just one ;)
Isn't this adorable!? It's made using a 10" x 3 1/2" piece of card stock scored at 2", 2 1/2", 6", & 6 1/2". I also used some Poppy Parade DSP to decorate the front 2 panels. The stamp set is the only scholastic set I have but it's retired :( I stamped the row of apples twice & colored them in using my Poppy Parade Stampin' Write marker. This holds a pad of post-it notes perfectly on the inside. I used Sticky Strip on the back of the note pad to make sure it stayed in place. You could add some velcro to keep the flap closed but I didn't have any on hand. Our youngest felt so proud carrying this to school & giving it to his teacher; he was definitely a big kid! ;)
I hope you enjoyed my little project today :) I may just make one for myself to keep on my workspace & decorate it without school stuff ;)
Happy Monday!
Tuesday, August 2, 2011
From babies to teenagers
Pin It Now!
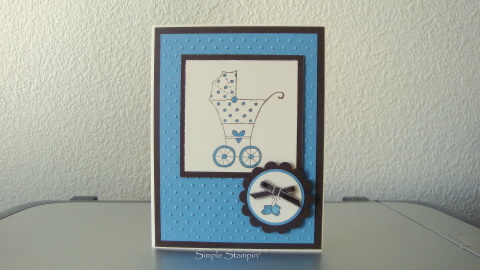
Yesterday was the first day of school for our 3 boys & I couldn't help but think about they've grown up way too fast. Our middle son started Middle School & I had a bit of a "moment" when I dropped him off & again when I picked him up; it seemed just like yesterday our oldest was at the same school :( Now that son is a sophomore & our "baby" (who didn't stay THAT for very long!) is in Pre-K. Remembering their "yesterdays" of course included when they were newborns & we just found out some friends of ours are expecting so I decided to share a baby boy card today. Not long ago I shared with you a baby girl card & here is the baby boy card I said I'd share "some day". Guess that would be today :)
I inked the image from the set "Baby Bundle" using StazOn & stamped it onto a piece of white card stock. On a scratch piece of white I did the same thing with the booties from the same set. I colored them both using the small tip on my Marina Mist marker. I took a piece of Marina Mist card stock & ran it through the Big Shot using the dotted background from one of the texturz plates. I layered that onto a piece of Early Espresso & put that on the white card base. I layered the baby buggy onto a piece of Early Espresso & put that onto the card. I punched out the booties using the 1 1/4" circle punch & layered that onto the Marina Mist circle that was punched out with the 1 3/8" circle punch. That was then put onto the Early Espresso scallop circle & popped up on dimensionals. For added textured I tied a little bow with some Early Espresso 1/8" taffeta ribbon that I adhered using a mini glue dot. The inside was left blank so it's ready for whenever I need to. I made up several of these baby boy cards & several of the baby girl cards I posted in an earlier post.
Now that summer vacation is officially over for us & we're starting a new routine I WILL post regularly. That is my New School Year's resolution. That & I WILL figure out the best approach to picking up 3 kids from 3 different schools over a 90 minute time span! ;) Hope you enjoy your day!
I inked the image from the set "Baby Bundle" using StazOn & stamped it onto a piece of white card stock. On a scratch piece of white I did the same thing with the booties from the same set. I colored them both using the small tip on my Marina Mist marker. I took a piece of Marina Mist card stock & ran it through the Big Shot using the dotted background from one of the texturz plates. I layered that onto a piece of Early Espresso & put that on the white card base. I layered the baby buggy onto a piece of Early Espresso & put that onto the card. I punched out the booties using the 1 1/4" circle punch & layered that onto the Marina Mist circle that was punched out with the 1 3/8" circle punch. That was then put onto the Early Espresso scallop circle & popped up on dimensionals. For added textured I tied a little bow with some Early Espresso 1/8" taffeta ribbon that I adhered using a mini glue dot. The inside was left blank so it's ready for whenever I need to. I made up several of these baby boy cards & several of the baby girl cards I posted in an earlier post.
Now that summer vacation is officially over for us & we're starting a new routine I WILL post regularly. That is my New School Year's resolution. That & I WILL figure out the best approach to picking up 3 kids from 3 different schools over a 90 minute time span! ;) Hope you enjoy your day!
Subscribe to:
Posts (Atom)