Sarah Goke ~ Independent Stampin’ Up! Demonstrator

Welcome to a nice, quiet place to stamp & relax

Showing posts with label Wedding. Show all posts

Tuesday, September 6, 2011

Another Invite

Pin It Now! Where oh where has the time gone!? It's September already & I haven't posted since last week. Labor Day is behind us & here in El Paso the weather has cooled down & feels like September; a far cry from the 100+ degree days we had for way too long. Right now it's 66 degrees at 8:00 AM, about 20+ degrees cooler than a few days ago at this time. Now if we could just get some rain....

Anyway, today I'd like to share with you the invite my sister-in-law has decided on for their re-commitment ceremony in April. They're celebrating 10 years of marriage & asked if I'd do their invites. All I had to go on is dark red, black, & roses. Umm, ok, I can work with that. Here's what they look like:
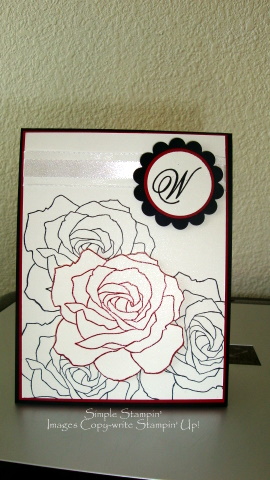
The card base is Basic Black with a layer of Cherry Cobbler. On the top layer of Shimmery White card stock I stamped 3 roses from the set "Fifth Avenue Floral" in Jet Black StazOn. I wrapped a strip of 5/8" organza ribbon around the top & used some sticky strip to adhere the ends to the back of the shimmery white card stock. I punched out a 1 3/4" scallop circle from black card stock & layered  a 1 3/8" Cherry Cobbler circle on top of that. I embossed the "W" from the set "Monogram Sweet Alphabet" using Versa Mark & black embossing powder on Shimmery White card stock. I then punched it out using the 1 1/4" circle punch & layering the punches using sticky strip. The entire scallop circle is on a dimensional on the ribbon. For a bit of a contrast I stamped the rose on a separate piece of Shimmery White card stock using the Cherry Cobbler Craft ink spot & clear embossing powder. I then cut it out & popped up on the black roses with dimensionals.
This is what the top looks like when you open it. The rose was stamped using Cherry Cobbler Craft ink spot & embossed with clear embossing powder on Cherry Cobbler card stock. The image was cut out & adhered using sticky strip. The invite itself will be created using My Digital Studio & printed onto Shimmery White card stock. There will be a Cherry Cobbler layer between the black base & the invite, just like on the front.

As far as the other wedding invites I've done this one is by far the simplest but I really like it. Not sure exactly how many I'll be making but they'll go together quickly enough. I have plenty of time to get these done & sent to my sister-in-law before they need them (the event isn't until April). This would make a stunning anniversary card as well.

Don't forget the new Holiday Mini sales period has started! Please email me if you don't have your own copy of the new mini; you don't want to miss all the AMAZING stuff in there! In my opinion it's the BEST mini I've ever seen ;) I'm currently working on a few things using the new products to share with you soon. Be sure to come back & check it out!

Have a great day! :)

Tuesday, June 14, 2011

June Wedding & SUO Challenge 21

Pin It Now!

I wanted to share with you the wedding invitation I made for some friends of ours who are getting married this weekend. Before I posted this I saw the challenge over at SU-Only Challenges & it's wedding themed! Here's our friend's invitation:
Here's a list of all the supplies I used:

Card stock: Very Vanilla; Early Espresso
Ink: Not Quite Navy craft Stampin' Spot; Not Quite Navy classic ink pad
Stamps: Wedding Sweet; Occasional Quotes
Accessories: Big Shot; "Elegant Bouquet" embossing folder; clear embossing powder; heat tool; 1 3/4" Scallop Circle punch; sponge; dimensionals; Snail


Here's the supplies for the inside:

Card stock: Very Vanilla; Early Espresso; Not Quite Navy
Ink: Not Quite Navy craft Stampin' Spot; Not Quite Navy classic ink pad
Stamps: Lovely Letters Alphabet
Accessories:  1 3/4" Scallop Circle punch; 1 1/4" Circle punch; sponge; Snail; My Digital Studio


I used MDS to create the inside of the invitations & also the RSVP cards. I wanted to keep the envelopes "normal" & not too bulky so the cost of postage was manageable so I made the RSVP cards postcards; I printed the bride & groom's address on the back so it was very easy for the guests to just fill out the front portion & send it back. MDS made the invitations go together rather quickly, that is after all the other work was finished ;) 
Our friends were very pleased with their invitations & I was pretty excited with how lovely they turned out. Hope you all enjoy looking at them. Have a terrific day! Why not challenge yourself & try out the SU-Only challenge?


Thursday, February 24, 2011

Weddings on my mind

Pin It Now! This week I have been busy working on invitations for a friend's upcoming wedding this summer so I don't have anything new to share today. However, I would like to share with you the wedding invitation I did for my cousin's wedding last September. Their colors were champagne & hot pink so I used Sahara Sand for the base & used the Elegant Bouquet embossing folder. I added a layer of Melon Mambo & used the Scallop Trim Border punch. The invitation was printed on Very Vanilla before I stamped the large flower from "Wedding Sweet" using Melon Mambo ink. The RSVP card went inside the pocket & the hotel information was adhered to the front of the pocket.. These were the very first wedding invitations I ever did & I am very pleased with the way they turned out; the bride & groom loved them, too :)  This weeks Pals Paper Arts challenge (PPA82) is to use scallops on your project so I think this "old" project may qualify, what do you think?