Pin It Now!
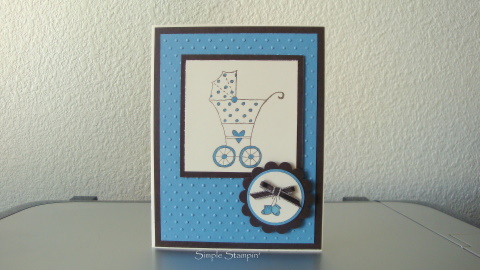
Yesterday was the first day of school for our 3 boys & I couldn't help but think about they've grown up way too fast. Our middle son started Middle School & I had a bit of a "moment" when I dropped him off & again when I picked him up; it seemed just like yesterday our oldest was at the same school :( Now that son is a sophomore & our "baby" (who didn't stay THAT for very long!) is in Pre-K. Remembering their "yesterdays" of course included when they were newborns & we just found out some friends of ours are expecting so I decided to share a baby boy card today. Not long ago I shared with you a baby girl card & here is the baby boy card I said I'd share "some day". Guess that would be today :)
I inked the image from the set "Baby Bundle" using StazOn & stamped it onto a piece of white card stock. On a scratch piece of white I did the same thing with the booties from the same set. I colored them both using the small tip on my Marina Mist marker. I took a piece of Marina Mist card stock & ran it through the Big Shot using the dotted background from one of the texturz plates. I layered that onto a piece of Early Espresso & put that on the white card base. I layered the baby buggy onto a piece of Early Espresso & put that onto the card. I punched out the booties using the 1 1/4" circle punch & layered that onto the Marina Mist circle that was punched out with the 1 3/8" circle punch. That was then put onto the Early Espresso scallop circle & popped up on dimensionals. For added textured I tied a little bow with some Early Espresso 1/8" taffeta ribbon that I adhered using a mini glue dot. The inside was left blank so it's ready for whenever I need to. I made up several of these baby boy cards & several of the baby girl cards I posted in an earlier post.
Now that summer vacation is officially over for us & we're starting a new routine I WILL post regularly. That is my New School Year's resolution. That & I WILL figure out the best approach to picking up 3 kids from 3 different schools over a 90 minute time span! ;) Hope you enjoy your day!
Sarah Goke ~ Independent Stampin’ Up! Demonstrator
Welcome to a nice, quiet place to stamp & relax
Tuesday, August 2, 2011
Monday, July 18, 2011
Are we there yet...?
Pin It Now!
Our 4 year old asked that question a "few" times over our 2-week vacation & we can finally say "Yes!" We left our house early on July 1st & arrived back home before noon July 17th. We spent our vacation visiting our families who are spread out in Kansas, Missouri, & Wisconsin. The time went way too fast (as always) but we had tons of fun! We spent time swimming, enjoying a baseball game, celebrating a few birthdays, & just spending quality time with family that we don't get to see very often. AND I even got to spend some quiet time stamping with my mom & a few other special ladies while I was vacationing. What made it even better is my hubby & my dad took the 3 boys out of the house while we could create without interruptions! How amazing is that!? Needless to say it was the best vacation I've had! lol I'll be sharing the projects I made at a little later but first I want to share the birthday card I made for my mother-in-law (her's was one of the few we celebrated)
On a piece of vanilla card stock I stamped the image using black StazOn & then used blender pens with different colors of ink to color it in. I trimmed it down so the piece was just barely wider than the stamped image. When I was satisfied with the coloring I ran it through the Big Shot using the Square Lattice embossing folder & layered it onto a piece of Early Espresso that was wider on one end. I then ran a 2nd piece of vanilla card stock through the Big Shot using the same embossing folder & took the Early Espresso piece & layered it on top. I took a piece of vanilla taffeta ribbon & wrapped it around all the layers & tied it to the front before using sticky strip to adhere the entire thing to the Early Espresso card base. I layered a vanilla top note that I cut out using the Big Shot so we could write a message on the inside. You could add any sentiment on the inside: Sympathy, Happy Birthday, Thank You, etc.
I am so glad to be back home so I can share more projects again! I have so much more to share with you so I'll be posting regularly now ;) Thanks for hanging it there while I was away. Come back soon! :)
Thursday, June 30, 2011
Last Day of Sneak Peeks
Pin It Now!
Today's project was created based on last week's sketch over at Mojo Monday. I know I'm late posting it for the challenge but I wanted to share it with all of you anyway. ;) I actually used a new stamp set so it's another Sneak Peek day to get you geared up for the new catty TOMORROW! I'm just a "little" excited for you all to finally be able to see all the awesome new goodies Stampin' Up! has in store in this year.
Well enough talking & lets getting sharing...
The sentiment is from the stamp set "Perfect Punches" & the background was created using an image from the NEW set called "My Friend". I randomly stamped the image onto a piece of Vanilla card stock using Pretty in Pink, Soft Suede, & Pear Pizzazz ink pads. I used one of the circle punches to notch out the top of the card stock & attached it to the Soft Suede card base. The sentiment was colored using my Pretty in Pink & Pear Pizzazz markers & stamped onto a piece of Very Vanilla. It was then punched out with the large oval punch. I trimmed a scrap piece of Pretty in Pink card stock & adhered that to the Vanilla layer. I didn't have any ribbon that I wanted so I trimmed a thin piece of Pear Pizzazz & layered that on top of the pink piece. The sentiment is popped up using dimensionals. I used my Pretty in Pink & Pear Pizzazz markers to add tiny "stitches" to give it a little contrast. To finish it all off I added plenty of bling with basic rhinestones.
This was a very quick & easy sketch to do & I'm sure I'll be using it again in the future :).
My family & I will be traveling to see extended family over the next 2 weeks so I'm not sure how often I'll be able to post. I am taking things to work on & will hopefully be able to post often. Hope you all have a wonderful day & check back again soon! :)
Wednesday, June 29, 2011
Sneak Peek Day #3
Pin It Now!
Before I talk about today's sneak peek I want to share with all of you some amazing news I received in my email late yesterday: the wedding invitation I submitted was one of the top 3 picks for the SUO Challenge I participated in last week! I am beyond shocked & happy! :) Since I was on of their top 3 I now have a new badge on the top left of my blog to display! Okay, so now that I'm done being super excited, how 'bout I show you today's sneak peek?
This card features a set called "Delicate Doilies" & the sentiment is from the new set "My Friend". I inked up the doilies using Wisteria Wonder, Pumpkin Pie, & Melon Mambo ink pads & stamped them onto a piece of white card stock. I then layered a piece of Wisteria Wonder card stock that I punched out using the Scallop Trim Border punch. On top of that there is a piece of Pumpkin Pie layered on top of another piece of Pumpkin Pie. The top layer has tails cut into it that are on dimensionals to give it a different look The large doily is laser-cut & double sided (one side is Melon Mambo & the other is Whisper White) & is from the "Flirtatious" specialty designer series paper. The colors that coordinate with this paper are: Melon Mambo, Pumpkin Pie, Wisteria Wonder, Daffodil Delight, Pretty in Pink, & Whisper White. The sentiment was stamped in Melon Mambo onto white card stock & then I cut tails into both ends & popped it up on a dimensional. Everything was mounted onto the Pretty in Pink card base.
This isn't my original design, rather I copied it from the monthly magazine that only us demo's receive. That's another perk of being a Stampin' Up! demonstrator ;) Let me know if you want to learn more & or want to sign up to become a demo yourself ;) It's great loving what you do & sharing what you love :) Contact me & I'll tell you how you can become a demo today!
Hope you've enjoyed these sneak peeks. I'll have more tomorrow so stop back to check it out! :)
Tuesday, June 28, 2011
Another Sneak Peek
Pin It Now!
Yesterday the temperature reached 106! It was already 90 when I ran some errands at 10:00 am & I'm so glad I didn't after go anywhere else for the day. Today is supposed to be the same; perhaps I should start on my Christmas cards so I'm not frantic come early December...? ;)
Today's sneak peek project uses a new set you can spend your earned hostess dollars on called "Precious Butterflies". The set includes a total of 9 stamps including 3 different sized butterflies & I used all the butterflies on this card. :) Hope you enjoy today's sneak peek:
The 2 larger ones were stamped in one of the new In Colors, Pool Party. I then stamped the smallest butterfly in another new In Color, Calypso Coral & cut them all out using my paper snips. The leaf/scroll image is one stamp but I wanted the scroll to be a different color so I used the Lucky Limeade marker (yet another new In Color) to color the leaf part & the Crumb Cake marker to color the scroll. I huffed on the entire stamp to moisten it before finally stamping it directly onto the white card front. The sentiment, from the same stamp set, was inked using Calypso Coral & stamped directly on the card front also. I layered the white piece onto a piece of Crumb Cake card stock & then added a strip of Chocolate Chip 1/2" scallop dots ribbon before adhering it all to the Early Espresso card base. I wanted the butterflies to pop off the page so I used dimensionals. It isn't exactly how I pictured it in my mind but that's okay :) I really like those colors together & they're not a combo in the Color Coach either ;)
Stay cool & enjoy your day!
Monday, June 27, 2011
Sneak Peek!
Pin It Now!
July 1st is fast approaching & we all know what that means...the release of the brand new Idea Book & Catalog from Stampin' Up! I've had my goodies for a couple of weeks & have had a ton of fun playing around with everything: new In Colors, new stamp sets, new punch, new ribbon...well, you get the idea. ;)
It has been soooo hot here (over 100 degrees for a long time now) so I sat down to cool off a bit. In order to do that I reached for a brand new set a couple of the new colors, a new punch & created...yup, a Christmas card! I think he's a cutie, how 'bout you?
He's from a new set called "Snow Much Fun" & I stamped him on water color paper with black StazOn. I then colored him using a blender pen & two new colors: Lucky Limeade & Island Indigo along with Chocolate Chip (his boots) & Peach Parfait (his nose). To pull the colors of his hat & scarf together I layered a piece of Lucky Limeade card stock on top of a piece of Island Indigo. I used the new Lace Ribbon Border punch & Sahara Sand card stock to created the "interest" on the left of the card front. It didn't stand out on top of the Sahara Sand card front so I used a sponge & sponged the same color ink on top; I like how it added some depth to it myself ;). I had it all put together & dropped an open ink pad on the bottom right corner sooooo I ripped it off, distressed the edge, sponged it with Sahara Sand ink. I opened the card & stamped the little bird on the snowball in Sahara Sand ink in the bottom right corner. Don't you just love how there are no mistakes in stamping? ;)
Hope everyone is staying cool where ever you are. Enjoy the rest of the day & I'll have another Sneak Peek for you tomorrow :)
Tuesday, June 21, 2011
Happy Father's Day
Pin It Now!
My family & I just got back last night from a wonderful long weekend spent in Colorado. It was so hectic before we left & I didn't get a chance to have anything ready to post while I was gone so........here's my belated Happy Father's Day card:
The color scheme is Early Espresso, Sahara Sand, Very Vanilla, & Basic Gray. The truck image (from the set "Countryside") was inked with Versa Mark first & immediately re-inked with Soft Suede before stamping it. I then used clear embossing powder on top. I used a blender pen with Basic Gray & Sahara Sand markers to color the second image (also from "Countryside") . The Ticket Corner punch added a little something to the layers. I can't seem to do a card lately without reaching for my favorite set, "Teeny Tiny Wishes", & the punches that coordinate beautifully with it; the Modern Label & Word Window punches. To add a bit more texture I layered a strip of Early Espresso card stock over a piece of Very Vanilla satin ribbon. Who says you can't use ribbon on masculine cards? ;)
That's all for today but I will be back soon with another fun creation :) Hope you all have a wonderful day & thanks so much for all the words of encouragement!
Subscribe to:
Posts (Atom)


