Sarah Goke ~ Independent Stampin’ Up! Demonstrator

Welcome to a nice, quiet place to stamp & relax

Thursday, September 15, 2011

New Sketch Challenge - FMS2

Pin It Now!
Earlier this week I came across a new site for sketch challenges: Freshly Made Sketches. By the time I first saw it the deadline for their 1st challenge was already past so I decided to try their 2nd challenge:


Here's what popped into my head when I first saw it:

I immediately had an image of a spider on a wall so I turned the card. I cut a 5" square piece of designer series paper from the pack Frightful Sight & used sticky strip to adhere here it to the white card base (measures 10 1/2" x 5 1/4" before folding). I took a 4" square piece of black card stock & ran it through the Big Shot using the Spider Web embossing folder & then I spritzed on some Vanilla Shimmer Smooch Spritz before adhering it to the background with sticky strip. On a scratch piece of white card stock I stamped the spider image from the set "Kidoodles" using StazOn & used a blender pen & Basic Black, Old Olive, & Cajun Craze markers to color him in. The image was punch out using the 2 3/8" Scallop Circle punch & the edges were sponged with Old Olive ink. A second 2 3/8" Scallop Circle was made in Cajun Craze & they were off-set & layered together with sticky strip & popped up on dimensionals. I used a second scrap piece of designer paper from the same pack & adhered it to the card using sticky strip. I punched a Cajun Craze circle using the 1" Circle punch & layered the spider I created using the 1/4" circle punch; used sticky strip to adhere that directly on the card. 

This new sketch was fun to do & went together fast. I will tell you that after working with all the spiders on this particular card I was a bit itchy...  ;) Enjoy the rest of your week & hope you come back to check out what other projects I'll have for you.  :)


Wednesday, September 14, 2011

Autumn Birthday

Pin It Now!
The weather has cooled off a little & it has me wishing west Texas had trees that will soon be beautiful reds, oranges, & yellows. Unfortunately that isn't the case :( To satisfy my "need" to experience those autumn colors I have to create a project :) So here's my little taste of autumn:
You can't have autumn without trees so my obvious choice for the stamp set was "Lovely As a Tree". I stamped them on white card stock using Versa Mark & embossed with black. I used sponges & added color using So Saffron, More Mustard, Pumpkin Pie, & at the very top I used Cajun Craze. I also used Soft Suede under the trees & around all four sides. Using daubers I lightly added color to the trees using Riding Hood Red, Cajun Craze, & Always Artichoke. I layered this onto a piece of Early Espresso card stock & popped it up on dimensionals before adhering it to the So Saffron card base. I used the set "Teeny Tiny Wishes" & stamped the sentiment onto a piece of white card stock using Always Artichoke ink & punched it out with the Word Window punch. I added the Always Artichoke Modern Label punch & popped this up on dimensionals. I used it for a birthday card but it would make a really nice sympathy or Thanksgiving card as well.

This satisfied my wanting to see gorgeous fall colors today :) I may have to make up some more autumn projects & display them in different areas in the house so I don't miss southwestern Wisconsin too bad (where I grew up). Hmm.....I think I can almost smell apples baking.... ;) Hope you all enjoy your day!


Tuesday, September 13, 2011

My First Shaker Card

Pin It Now! In my recent post I mentioned stepping out of the box & I tried something new yesterday afternoon: I made my very first shaker card. I know it's not a new idea but up until now I guess I just wasn't sure what I wanted to attempt it on. Not long ago I saw a fellow demonstrator post a Christmas card that had a cute snowman & I instantly knew I wanted to try my own; I never thought to try him this way but isn't he cute?


I stamped the snowman from the set "Snow Much Fun" onto a piece of  2 3/4" x 2 1/2" Whisper White card stock using StazOn. I then used a craft knife to cut out his belly being careful to cut inside of the black line. I used Riding Hood Red, Wild Wasabi, Chocolate Chip, & Pumpkin Pie to color him in. I cut a second piece of white card stock measuring 2" x 2 1/2" & placed it under him so I could lightly trace his belly so I knew where to position him later; set the snowman image aside for now. I used the new shaker frames from the Holiday Mini & put it around the traced belly image on the smaller piece of card stock. I put some mica flakes inside the circle (also from the new mini) & took off the backing on the shaker frame. I placed a piece of plastic baggie that I had cut (I didn't have any window sheets; I have hear of people using cello bags, too) over the shaker frame. Once it was secure I used my paper snips to trim the plastic so not much excess hung over the shaker frame. I stacked 2 dimensionals on top of each other (that's how high the shaker frame is) & placed them in 4 corners close to the shaker frame before placing the snowman on top. I used sticky strip to adhere the entire snowman to a layer of Riding Hood Red. This entire layer was placed on top of a piece of textured Wild Wasabi card stock with more sticky strip. I added some Chocolate Chip dotted spots ribbon before finally adhering the layer to the Riding Hood Red card base. I don't know if it shows in the picture but I used some Dazzling Details to the snowball in his hand & to his face. I also used a glue dot & added a jingle bell to his hat. The sentiment will go on the inside on a piece of 5 1/4" x 4" white card stock.

It really went together quicker than I thought; it took me longer typing out the directions than actually doing it. He is so fun & jingles, too! :)  He just may be a Christmas card I have to send to a few this year. ;) I'm so glad I decided to try him; I learned something new & had fun doing it.

Well I'm off to see what other things I can do today. I've had Christmas on my mind for a few days so maybe I can get some Thanksgiving mojo flowing :)  Have a great day & hope you too learn something new today :)


Monday, September 12, 2011

Combined Challenges

Pin It Now!
A couple of weeks ago Mojo Monday had a sketch challenge that I just had to try & I've done a few cards with the same sketch; I like it that much :). I also saw a color challenge over at CCMC using Pumpkin Pie, Rich Razzleberry, & Lucky Limeade. Today I'm sharing the card that come together when I paired these two challenges together:
It's hard to tell in the photo but the card base is Very Vanilla. On top of the bottom Pumpkin Pie layer is a piece of Very Vanilla designer paper (from the Neutrals designer series pack) with a piece of Pumpkin Pie 1/4" grosgrain ribbon. The larger panel is Very Vanilla layered on top of Lucky Limeade with Pumpkin Pie & Rich Razzleberry butterflies I cut out using the Big Shot & the Beautiful Wings embosslits die; this was popped up using dimensionals. The smaller panel is once again Very Vanilla layered on top of a piece of Lucky Limeade. On a scratch piece of Very Vanilla card stock I stamped two of the flowers from the set "For All You Do", one using Pumpkin Pie ink & the other using Rich Razzleberry ink, & cut them out using my paper snips. I popped each of them up on a dimensional & then hand drew the stem using my Lucky Limeade marker. This panel was popped up on dimensionals as well before using dimensionals to pop up the whole layer on top of the card base. For the finishing element I grabbed my Doily Triple Layer punch & used it in the first position to punch out a piece of Rich Razzleberry card stock. I then used it in the third position on a piece of Lucky Limeade & just layered them together with 2-way glue before adding a Pumpkin Pie button using a dab of Crystal Effects. I left the sentiment off since I wasn't sure what this particular card will be used for yet but I'll be able it on the inside.

This card went together fairly quick & the color combo is pretty, too. This is definitely a sketch I'll be using again & again :) Why not challenge yourself today? What colors are you a bit shy of? Is there a particular sketch or layout you're not sure about? Step out of the box & see what new favorites may await you. :) Have fun & don't forget to laugh! :)

Tuesday, September 6, 2011

Another Invite

Pin It Now! Where oh where has the time gone!? It's September already & I haven't posted since last week. Labor Day is behind us & here in El Paso the weather has cooled down & feels like September; a far cry from the 100+ degree days we had for way too long. Right now it's 66 degrees at 8:00 AM, about 20+ degrees cooler than a few days ago at this time. Now if we could just get some rain....

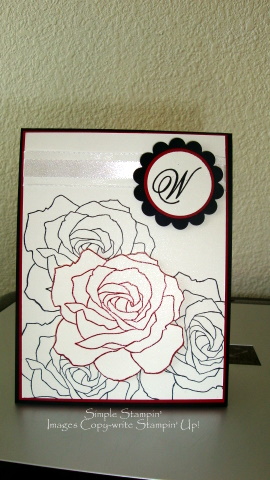
Anyway, today I'd like to share with you the invite my sister-in-law has decided on for their re-commitment ceremony in April. They're celebrating 10 years of marriage & asked if I'd do their invites. All I had to go on is dark red, black, & roses. Umm, ok, I can work with that. Here's what they look like:
The card base is Basic Black with a layer of Cherry Cobbler. On the top layer of Shimmery White card stock I stamped 3 roses from the set "Fifth Avenue Floral" in Jet Black StazOn. I wrapped a strip of 5/8" organza ribbon around the top & used some sticky strip to adhere the ends to the back of the shimmery white card stock. I punched out a 1 3/4" scallop circle from black card stock & layered  a 1 3/8" Cherry Cobbler circle on top of that. I embossed the "W" from the set "Monogram Sweet Alphabet" using Versa Mark & black embossing powder on Shimmery White card stock. I then punched it out using the 1 1/4" circle punch & layering the punches using sticky strip. The entire scallop circle is on a dimensional on the ribbon. For a bit of a contrast I stamped the rose on a separate piece of Shimmery White card stock using the Cherry Cobbler Craft ink spot & clear embossing powder. I then cut it out & popped up on the black roses with dimensionals.
This is what the top looks like when you open it. The rose was stamped using Cherry Cobbler Craft ink spot & embossed with clear embossing powder on Cherry Cobbler card stock. The image was cut out & adhered using sticky strip. The invite itself will be created using My Digital Studio & printed onto Shimmery White card stock. There will be a Cherry Cobbler layer between the black base & the invite, just like on the front.

As far as the other wedding invites I've done this one is by far the simplest but I really like it. Not sure exactly how many I'll be making but they'll go together quickly enough. I have plenty of time to get these done & sent to my sister-in-law before they need them (the event isn't until April). This would make a stunning anniversary card as well.

Don't forget the new Holiday Mini sales period has started! Please email me if you don't have your own copy of the new mini; you don't want to miss all the AMAZING stuff in there! In my opinion it's the BEST mini I've ever seen ;) I'm currently working on a few things using the new products to share with you soon. Be sure to come back & check it out!

Have a great day! :)